作者:Adam Freeman
翻译:陈广
日期:2018-10-11
标签助手(Tag helper)是 ASP.NET Core MVC 中引入的一种新特性,它是视图中转化 HTML 元素的 C# 类。标签助手的常见用途包括使用应用程序的路由配置为表单生成 URL,确保特定类型的元素的样式一致,以及用常用的内容片段替换自定义的速记元素。在本章中,我将描述标签助手是如何工作的,以及如何创建和应用自定义标签助手。在第24章中,我描述了支持 HTML 表单的内置标签助手,在第25章中,我描述了 MVC 提供的其他内置标签助手。表23-1为标签助手简历。
标签助手组件
ASP.NET Core 2 平台引入了标签助手组件,它们是可以在发送给客户端的响应中修改特定的 HTML 片段并可由标签助手使用的类。我没有描述这个特性,因为它的实现很笨拙,对大多数 MVC 开发人员没有多大用处。如果希望转换发送给客户端的响应中的内容,请使用本章中描述的标签助手特性。
表 23-1:标签助手简历
| 问题 | 回答 |
|---|---|
| 它们是什么? | 标签助手是操纵 HTML 元素的类,它们要么以某种方式改变它们,要么用附加的内容来补充它们,或者用新的内容完全替换它们。 |
| 它们有何用途? | 标签助手允许使用 C# 逻辑生成或转换视图内容,以确保发送给客户端的 HTML 反映应用程序的状态。 |
| 如何使用它们 | 应用标签助手的 HTML 元素是根据类的名称或通过使用HTMLTargetElement特性来选择的。当渲染视图时,元素由标签助手转换,并包含在发送给客户端的 HTML 中。 |
| 是否有任何缺陷或限制? | 可以很容易地使用标签助手来获取和生成 HTML 内容的复杂部分,正如第22章所述,使用视图组件可以更容易地实现这一点。 |
| 有没有其他选择? | 您不必使用标签助手,但它们使在 MVC应用程序中生成复杂的 HTML 变得非常容易。 |
表 23-2 为本章摘要
表 23-2:本章摘要
| 问题 | 解决方案 | 清单 |
|---|---|---|
| 转换 HTML 元素 | 创建标签助手,并在视图文件或视图导入文件中使用@addTagHelper表达式注册它 |
10-12 |
| 管理标签助手的作用域 | 使用HtmlTargetElement特性 |
13-17 |
| 支持速记元素 | 使用TagHelperOutput对象生成替换元素 |
18、19 |
| 在目标元素周围或内部插入内容 | 使用TagHelperOutput类提供的Pre-和Post-属性 |
22-23 |
| 在标签助手中接收 context 数据 | 使用ViewContext和HtmlAttributeNotBound特性装饰属性 |
24、25 |
| 访问视图模型 | 使用ModelExpression属性 |
26、27 |
| 协同标签助手 | 使用TagHelperContext.Items属性 |
28、29 |
| 抑制元素 | 使用SuppressOutput方法 |
30、31 |
本章我使用【ASP.NET Core Web 应用程序(.NET Core)】模板创建了一个名为 Cities 的新的空项目。
我创建了 Models 文件夹,添加了一个名为 City.cs 的文件,并使用它来定义清单23-1所示的类。
清单 23-1:Models 文件夹下的 City.cs 文件的内容
namespace Cities.Models
{
    public class City
    {
        public string Name { get; set; }
        public string Country { get; set; }
        public int? Population { get; set; }
    }
}
为了给城市对象创建一个存储库,我在 Models 文件夹中添加了一个名为 Repository.cs 的类文件,并使用它来定义如清单23-2所示的接口和实现类。
清单 23-2:Models 文件夹下的 Repository.cs 文件的内容
using System.Collections.Generic;

namespace Cities.Models
{
    public interface IRepository
    {
        IEnumerable<City> Cities { get; }
        void AddCity(City newCity);
    }

    public class MemoryRepository : IRepository
    {
        private List<City> cities = new List<City> {
            new City { Name = "London", Country = "UK", Population = 8539000},
            new City { Name = "New York", Country = "USA", Population = 8406000 },
            new City { Name = "San Jose", Country = "USA", Population = 998537 },
            new City { Name = "Paris", Country = "France", Population = 2244000 }
        };

        public IEnumerable<City> Cities => cities;

        public void AddCity(City newCity)
        {
            cities.Add(newCity);
        }
    }
}
本章中的示例只需要一个控制器。我创建了 Controllers 文件夹,添加了一个名为 HomeController.cs 的类文件,并使用它定义了如清单23-3所示的控制器。
清单 23-3:Controllers 文件夹下的 HomeController.cs 文件的内容
using Microsoft.AspNetCore.Mvc;
using Cities.Models;

namespace Cities.Controllers
{
    public class HomeController : Controller
    {
        private IRepository repository;

        public HomeController(IRepository repo)
        {
            repository = repo;
        }

        public ViewResult Index() => View(repository.Cities);

        public ViewResult Create() => View();

        [HttpPost]
        public IActionResult Create(City city)
        {
            repository.AddCity(city);
            return RedirectToAction("Index");
        }
    }
}
控制器提供了一个Index action,列出了存储库中的对象,并提供了一对Create方法,允许用户使用表单创建新的City对象,这与前面章节中的示例相同。
此应用程序中的视图将使用共享布局。我创建了 Views/Shared 文件夹,在其中添加了一个名为 _Layout.cshtml 的文件的布局,并添加了清单23-4所示的标记。
注意:由于本章的目的是演示标签助手是如何工作的,因此示例应用程序的布局和视图只使用标准 HTML 元素编写,这些元素将被替换为不同的标签助手。
清单 23-4:Views/Shared 文件夹下的 _Layout.cshtml的内容
<!DOCTYPE html>
<html>
<head>
    <meta name="viewport" content="width=device-width" />
    <title>Cities</title>
    <link href="/lib/twitter-bootstrap/css/bootstrap.css" rel="stylesheet" />
</head>
<body class="m-1 p-1">
    <div>@RenderBody()</div>
</body>
</html>
接下来,我创建了 Views/Home 文件夹,并使用清单23-5所示的标记添加了一个名为 Index.cshtml 的文件。
清单 23-5:Views/Home 文件夹下的 Index.cshtml 文件的内容
@model IEnumerable<City>

@{ Layout = "_Layout"; }

<table class="table table-sm table-bordered">
    <thead class="bg-primary text-white">
        <tr>
            <th>Name</th>
            <th>Country</th>
            <th class="text-right">Population</th>
        </tr>
    </thead>
    <tbody>
        @foreach (var city in Model)
        {
            <tr>
                <td>@city.Name</td>
                <td>@city.Country</td>
                <td class="text-right">@city.Population?.ToString("#,###")</td>
            </tr>
        }
    </tbody>
</table>
<a href="/Home/Create" class="btn btn-primary">Create</a>
此视图使用City对象序列填充表格,并包含一个以 /Home/Create URL为目标的a元素,使用 Bootstrap 将其样式为按钮。对于第二个视图,我向 Views/Home 文件夹添加了一个名为 Create.cshtml 的文件,标记如清单23-6所示。
清单 23-6:Views/Home 文件夹下的 Create.cshtml 文件的内容
@model City

@{ Layout = "_Layout"; }

<form method="post" action="/Home/Create">
    <div class="form-group">
        <label for="Name">Name:</label>
        <input class="form-control" name="Name" />
    </div>
    <div class="form-group">
        <label for="Country">Country:</label>
        <input class="form-control" name="Country" />
    </div>
    <div class="form-group">
        <label for="Population">Population:</label>
        <input class="form-control" name="Population" />
    </div>
    <button type="submit" class="btn btn-primary">Add</button>
    <a class="btn btn-primary" href="/Home/Index">Cancel</a>
</form>
我在 Views 文件夹中创建了一个名为 _ViewImports.cshtml 的视图导入文件,并添加了清单23-7所示的表达式。这允许我在不使用命名空间的情况下引用 Models 文件夹中的类。
清单 23-7:Views 文件夹下的 _ViewImports.cshtml 文件的内容
@using Cities.Models
此示例中的视图依赖于 Bootstrap CSS 包。为在示例项目中添加 Bootstrap,我在 Cities 项目中单击鼠标右键,在弹出菜单中选择【添加】➤【添加客户端库】,并将 twitter-bootstrap 添加至项目中。最终生成的 libman.json 配置文件代码清单18-7所示:
清单 23-8:Cities 文件夹下的 libman.json 文件的内容
{
  "version": "1.0",
  "defaultProvider": "cdnjs",
  "libraries": [
    {
      "library": "twitter-bootstrap@4.1.3",
      "destination": "wwwroot/lib/twitter-bootstrap/"
    }
  ]
}
最后的准备步骤是配置应用程序,如清单23-9所示。这是我在本书本部分的所有示例项目中使用的基本配置,还有一个附加语句,该语句使用单例生命周期将存储库注册为服务。
清单 23-9:Cities 文件夹下的 Startup.cs 文件的内容
using Microsoft.AspNetCore.Builder;
using Microsoft.AspNetCore.Hosting;
using Microsoft.AspNetCore.Http;
using Microsoft.Extensions.DependencyInjection;
using Cities.Models;

namespace Cities
{
    public class Startup
    {
        public void ConfigureServices(IServiceCollection services)
        {
            services.AddSingleton<IRepository, MemoryRepository>();
            services.AddMvc();
        }

        public void Configure(IApplicationBuilder app, IHostingEnvironment env)
        {
            app.UseStatusCodePages();
            app.UseDeveloperExceptionPage();
            app.UseStaticFiles();
            app.UseMvcWithDefaultRoute();
        }
    }
}
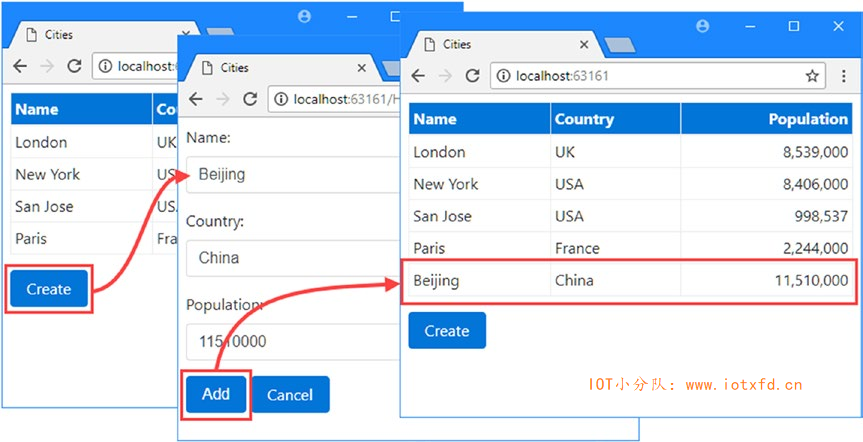
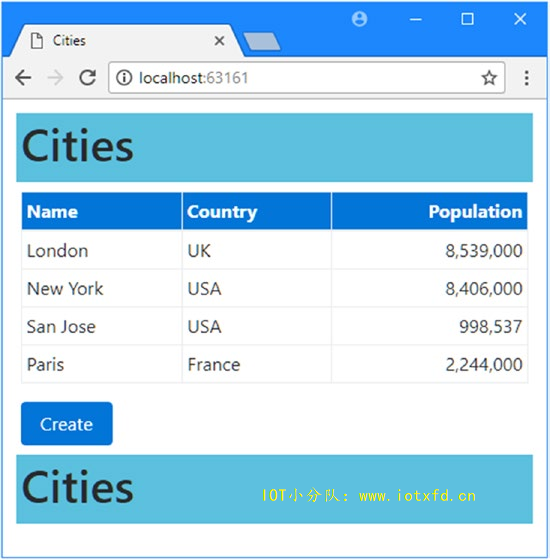
如果运行应用程序,默认情况下,您将看到存储库创建的City对象的列表。单击【Create】按钮,填写表单,然后单击【Add】按钮;一个新对象将被添加到存储库中,如图23-1所示。
与许多 MVC 特性一样,理解标签助手的最佳方法是创建标签助手,这将揭示它们是如何操作的,以及它们是如何与应用程序相匹配的。在接下来的部分中,我将介绍创建和应用标签助手的过程,它将为一个button元素应用 Bootstrap CSS 类,以便 让一个象这样的元素:
...
<button type="submit" bs-button-color="danger">Add</button>
...
转化为:
...
<button type="submit" class="btn btn-danger">Add</button>
...
标签助手将识别bs-button-color属性,并使用它的值来设置发送到浏览器的元素的class属性。这并不是最戏剧性或最有用的转换,但它为解释标签助手如何工作提供了一个基础。
标签助手可以在项目的任何地方定义,但是将它们保存在一起是有用的,因为与大多数 MVC 组件不同的是,它们需要在使用之前进行注册。我将在 Infrastructure/TagHelpers 文件夹中创建标签助手,并将其添加到项目中。
标签助手是从Microsoft.AspNetCore.Razor.TagHelpers命名空间中定义的TagHelper类派生的。为了创建一个标签助手,我在 Infrastructure/TagHelpers 文件夹中添加了一个名为 ButtonTagHelper.cs 的文件,并使用它来定义清单23-10所示的类。
清单 23-10:Infrastructure/TagHelpers 文件夹下的 ButtonTagHelper.cs 文件的内容
using Microsoft.AspNetCore.Razor.TagHelpers;

namespace Cities.Infrastructure.TagHelpers
{
    public class ButtonTagHelper : TagHelper
    {
        public string BsButtonColor { get; set; }

        public override void Process(TagHelperContext context,
                TagHelperOutput output)
        {
            output.Attributes.SetAttribute("class", $"btn btn-{BsButtonColor}");
        }
    }
}
TagHelper类定义了一个Process方法,该方法被子类覆盖,以实现转换元素的行为。标签助手的名称组合了它转换的元素的名称,后面跟着TagHelper。在这个例子中,类名ButtonTagHelper告诉 MVC,这是一个对button元素进行操作的标签助手。可以使用特性扩展或缩小标签助手的范围,我在《管理标签助手的作用域》一节中对此进行了描述,但这是默认行为。
提示:异步标签助手可以通过重写
ProcessAsync方法来创建,而不是Process方法,但是对于大多数助手来说,这并不是必需的,因为它倾向于对 HTML 元素进行小的、有重点的更改。ProcessAsync的默认实现无论如何都会调用Process方法。您可以在第24章中看到异步标签助手的示例。
标签助手通过TagHelperContext类的实例接收有关他们正在转换的元素的信息,该实例是作为Process方法的参数接收的,定义了表23-3中描述的属性。
表 23-3:TagHelperContext 属性
| 名称 | 描述 |
|---|---|
| AllAttributes | 此属性返回应用于正在转换的元素的属性的只读字典,并按名称和 Index 进行索引。 |
| Items | 此属性返回用于在标签助手之间进行协调的字典,如《标签助手之间的协调》一节所述。 |
| UniqueId | 此属性返回要转换的元素的唯一标识符 |
虽然您可以通过AllAttributes字典访问元素属性的详细信息,但更方便的方法是定义其名称与您感兴趣的属性相对应的属性,如下所示:
...
public string BsButtonColor { get; set; }
...
当使用标签助手时,MVC 检查它定义的属性,并设置其名称与应用于 HTML 元素的属性相匹配的值。作为此过程的一部分,MVC 将尝试转换属性值以匹配 C# 属性的类型,这样 bool 属性可用于接收true和false属性值,int属性可用于接收数字属性值,如 1 和 2。
HTML助手怎么了?
ASP.NET MVC 的早期版本使用 HTML 助手生成表单元素。HTML 助手是通过以
@Html开头的 Razor 表达式访问的方法,这样就可以为Population属性创建一个input元素,如下所示:
...
@Html.TextBoxFor(m => m.Population)
...
HTML 助手表达式的问题是它们不符合 HTML 元素的结构,这导致了类似于以下的尴尬表达式,该表达式将 Bootstrap 样式添加到生成的元素中:
...
@Html.TextBoxFor(m => m.Population, new { @class = "form-control" })
...
属性必须在动态对象中表示,如果它们是保留的 C# 关键字(如
class),则必须以@作为前缀。随着所需的 HTML 元素变得更加复杂,HTML 助手表达式变得更加笨拙。标签助手通过使用 HTML 属性来消除笨拙,如下所示:
...
<input class="form-control" asp-for="Population" />
...
其结果是更自然地符合 HTML,并产生更易于阅读和理解的视图。MVC 仍然支持 HTML 助手(实际上,标签助手在幕后使用 HTML 助手),因此您可以在最初为 MVC 5 开发的视图中使用它们来实现向后兼容性,但是新视图应该利用标签助手提供的更自然的方法。
属性的名称将自动从默认的 HTML 方式bs-button-color转换为 C# 方式BsButtonColor。您可以使用除asp-(Microsoft使用的)和data-以外的任何属性前缀(这是为发送到客户端的自定义属性保留的)。在该示例中,我使用此属性接收应用于Process方法中的button元素的配色方案,如下所示:
...
output.Attributes.SetAttribute("class", $"btn btn-{BsButtonColor}");
...
如果属性没有设置对应 HTML 元素属性,这意味着您应该进行检查,以确保您没有处理null值或默认值。有关更改标签助手的作用域的详细信息,请参阅《管理标签助手的作用域》一节,以便它仅用于定义所依赖的属性的元素。
提示:为标签助手属性使用 HTML 属性名称并不总是会生成可读的或可理解的类。您可以使用
HtmlAttributeName特性断开属性名称与它所表现的 HTML 属性之间的链接,该特性可用于指定该属性将表示的 HTML 属性。
Process方法通过配置作为参数接收的TagHelperOutput对象来转换元素。TagHelperOutput首先描述显示在 Razor 视图中的 HTML 元素,并通过表23-4中描述的属性和方法进行修改。
表 23-4:TagHelperOutput 的属性和方法
| 名称 | 描述 |
|---|---|
| TagName | 此属性用于获取或设置输出元素的标签名 |
| Attributes | 此属性返回包含输出元素属性的字典 |
| Content | 此属性返回用于设置元素内容的TagHelperContent对象。 |
| PreElement | 此属性返回一个TagHelperContext对象,用于在输出元素之前插入视图中的内容。请参阅《前置并附加内容和元素》一节。 |
| PostElement | 此属性返回一个TagHelperContext对象,用于在输出元素之后插入视图中的内容。请参阅《前置并附加内容和元素》一节。 |
| PreContent | 此属性返回一个TagHelperContext对象,用于在输出元素的内容之前插入内容。请参阅《前置并附加内容和元素》一节。 |
| PostContent | 此属性返回一个TagHelperContext对象,用于在输出元素的内容之后插入内容。请参阅《前置并附加内容和元素》一节。 |
| TagMode | 此属性指定如何使用TagMode枚举中的值写入输出元素。请参阅《创建速记元素》一节。 |
| SupressOuput() | 调用此方法将从视图中排除一个元素。请参阅《抑制输出元素》一节。 |
在ButtonTagHelper类中,我使用Attributes字典将一个class属性添加到 HTML 元素中,以指定按钮的 Bootstrap 样式,包括BsButtonColor属性的值,这意味着可以使用 Bootstrap 名称(如primary、info和danger)指定不同的颜色。
标签助手类只能在使用 Razor @addTagHelper表达式注册后才能使用。应用标签助手的视图集取决于@addTagHelper表达式的使用位置。对于单个视图,表达式显示在视图本身中。对于应用程序中视图的子集,表达式出现在包含视图或父文件夹的文件夹中的 _ViewImports.cshtml 文件中,这样 /Views/Home/_ViewImports.cshtml 文件中的@addTagHelper表达式将为与Home控制器关联的所有视图注册标签助手。我希望在本章中创建的标签助手在应用程序中的所有视图中都可用,因此我使用了最后一个选项,即将@addTagHelper表达式添加到 Views/_ViewImports.cshtml 文件中,如清单23-11所示。
清单 23-11:Views 文件夹下的 _ViewImports.cshtml 文件,注册标签助手
@using Cities.Models
@addTagHelper Cities.Infrastructure.TagHelpers.*, Cities
参数的第一部分指定标签助手类的名称,并支持通配符;第二部分指定定义它们的程序集的名称。在清单中,我已经注册了Cities程序集的Cities.Infrastructure.TagHelpers命名空间中的所有标签助手。
最后一步是使用标签助手来转换元素。在清单23-12中,我从 Create.cshtml 视图中的button元素中移除了class属性,并将其替换为ButtonTagHelper类寻找的属性。
清单 23-12:Views/Home 文件夹下的 Create.cshtml 文件,使用标签助手
@model City

@{ Layout = "_Layout"; }

<form method="post" action="/Home/Create">
    <div class="form-group">
        <label for="Name">Name:</label>
        <input class="form-control" name="Name" />
    </div>
    <div class="form-group">
        <label for="Country">Country:</label>
        <input class="form-control" name="Country" />
    </div>
    <div class="form-group">
        <label for="Population">Population:</label>
        <input class="form-control" name="Population" />
    </div>
    <button type="submit" bs-button-color="danger">Add</button>
    <a class="btn btn-primary" href="/Home/Index">Cancel</a>
</form>
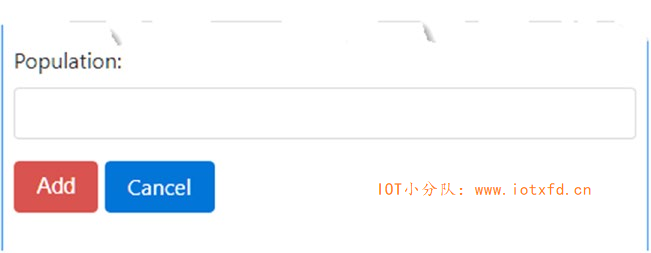
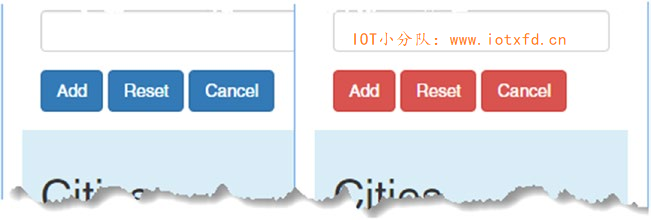
如果运行应用程序并单击【Create】按钮,浏览器将请求 /Home/Create URL,您将看到【Add】按钮的样式和颜色发生了变化,如图23-2所示。
对标签助手进行单元测试
单元测试标签助手类是一个相对简单的过程,它依赖于为
Process方法提供要处理的有意义的内容。下面是清单23-12中标签助手的单元测试示例:
using System.Collections.Generic;
using System.Linq;
using System.Threading.Tasks;
using Cities.Infrastructure.TagHelpers;
using Microsoft.AspNetCore.Razor.TagHelpers;
using Xunit;

namespace Cities.Tests {
    public class TagHelperTests {
        [Fact]
        public void TestTagHelper() {
            // Arrange
            var context = new TagHelperContext(
                new TagHelperAttributeList(),
                new Dictionary<object, object>(),
                "myuniqueid");

            var output = new TagHelperOutput("button",
                new TagHelperAttributeList(), (cache, encoder) =>
                    Task.FromResult<TagHelperContent>
                        (new DefaultTagHelperContent()));

            // Act
            var tagHelper = new ButtonTagHelper {
                BsButtonColor = "testValue"
            };
            tagHelper.Process(context, output);

            // Assert
            Assert.Equal($"btn btn-{tagHelper.BsButtonColor}",
                output.Attributes["class"].Value);
        }
    }
}
这个单元测试中的大部分工作都是设置
TagHelperContext和TagHelperOutput对象,这样就可以将它们传递给标签助手的Process方法并进行检查,以确保 HTML 元素已被正确转换。准备用于测试的标签助手所需的工作量很自然地取决于它所操作的 HTML 的复杂性及其转换的程度。但是,大多数标签助手相对简单,可以通过遵循前面显示的基本模式进行测试。
标签助手应用于给定类型的所有元素,这意味着对应用程序中每个视图中的每个button元素都将调用在上一节中创建的ButtonTagHelper类的Process方法。这并不总是有用的。为了给出一个问题的例子,我在 Create.cshtml 视图中添加了另一个按钮元素,如清单23-13所示。
清单 23-13:Views/Home 文件夹下的 Create.cshtml 文件,添加一个按钮元素
@model City

@{ Layout = "_Layout"; }

<form method="post" action="/Home/Create">
    <div class="form-group">
        <label for="Name">Name:</label>
        <input class="form-control" name="Name" />
    </div>
    <div class="form-group">
        <label for="Country">Country:</label>
        <input class="form-control" name="Country" />
    </div>
    <div class="form-group">
        <label for="Population">Population:</label>
        <input class="form-control" name="Population" />
    </div>
    <button type="submit" bs-button-color="danger">Add</button>
    <button type="reset" class="btn btn-primary">Reset</button>
    <a class="btn btn-primary" href="/Home/Index">Cancel</a>
</form>
新的按钮元素已经有了一个class属性,并且不需要ButtonTagHelper类执行的转换。但是,如果运行应用程序并请求 /Home/Create URL,您将看到出现了一个问题,如图23-3所示。
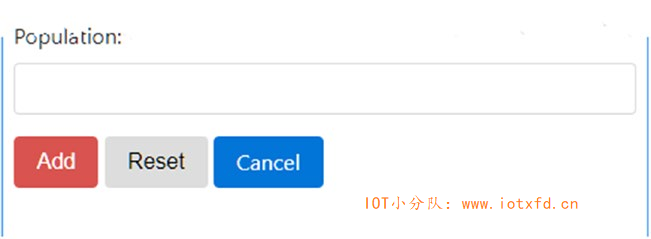
通过查看发送到浏览器的 HTML 可以看出格式错误的原因,它暴露了class属性的问题,如下所示:
<button type="reset" class="btn btn-">Reset</button>
MVC 对新的button元素应用了ButtonTagHelper,但是没有为BsButtonColor属性设置值,因为 HTML 元素上没有对应的bs-button-color属性。因此,标签助手将class属性替换为一个没有正确指定 Bootstrap 样式并生成格式不佳的元素的类属性。
解决这个问题有两种可能的方法。第一种方法是修改ButtonTagHelper类,使其感知可能遇到的不同按钮元素。对于示例应用程序,这将调用检查,以查看是否存在bs-button-color属性,并确保如果已定义class属性则不进行替换。这种方法的问题是,随着包含按钮元素的视图被添加到应用程序中,标签助手类变得越来越复杂,所有新的额外复杂性都表明了ButtonTagHelper类无法执行其转换的条件。
第二种方法是允许标签助手描述如何使用它的限制,从而缩小应用它的范围。使用HtmlTargetElement属性应用标签助手限制,如清单23-14所示。
清单 23-14: Infrastructure/TagHelpers 文件夹下的 ButtonTagHelper.cs 文件,缩小范围
using Microsoft.AspNetCore.Razor.TagHelpers;

namespace Cities.Infrastructure.TagHelpers
{
    [HtmlTargetElement("button", Attributes = "bs-button-color", ParentTag = "form")]
    public class ButtonTagHelper : TagHelper
    {
        public string BsButtonColor { get; set; }

        public override void Process(TagHelperContext context,
                TagHelperOutput output)
        {
            output.Attributes.SetAttribute("class", $"btn btn-{BsButtonColor}");
        }
    }
}
HtmlTargetElement特性描述标签助手应用到的元素。第一个参数指定元素类型,并支持表23-5中描述的其他命名属性。
表 23-5:HtmlTargetElement 特性
| 名称 | 描述 |
|---|---|
| Attributes | 此属性用于指定标签助手只应用于具有给定属性集的元素,这些属性作为逗号分隔的列表提供。元素必须具有所有指定的特性。以星号结尾的属性名将被视为前缀,因此bs-button-*将与bs-button-color、bs-button-size等匹配。 |
| ParentTag | 此属性用于指定标签助手只应用于包含在给定类型的元素中的元素。 |
| TagStructure | 此属性用于指定标签助手仅应用于标签结构与TagStructure枚举中的给定值相对应的元素,TagStructure枚举定义Unspecified、NormalOrSelfClosing和WithoutEndTag。 |
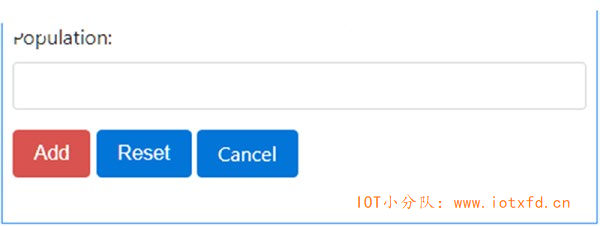
在清单23-14中,我限制了ButtonTagHelper类,以便它只应用于具有bs-button-color属性并且其父元素是form元素的button元素。如果运行应用程序并请求 /Home/Create URL,您将看到【Reset】按钮不再被转换,因为它缺少所需的属性,如图23-4所示。
HtmlTargetElement特性还可用于扩大标记助手的范围,使其与更广泛的元素匹配。当您需要对多个元素类型执行相同的转换时,这是非常有用的,这违背了基于标签助手类名匹配元素的前提,如清单23-15所示。
清单 23-15:Infrastructure/TagHelpers 文件夹下的 ButtonTagHelper.cs 文件,扩大范围
using Microsoft.AspNetCore.Razor.TagHelpers;

namespace Cities.Infrastructure.TagHelpers
{
    [HtmlTargetElement(Attributes = "bs-button-color", ParentTag = "form")]
    public class ButtonTagHelper : TagHelper
    {
        public string BsButtonColor { get; set; }

        public override void Process(TagHelperContext context,
                TagHelperOutput output)
        {
            output.Attributes.SetAttribute("class", $"btn btn-{BsButtonColor}");
        }
    }
}
这个清单省略了HtmlTargetElement的元素类型,这意味着标签助手将应用于任何具有bs-button-color属性的元素,而不管元素类型如何。在清单23-16中,我修改了表单中的a元素,该元素使用与按钮元素相同的 Bootstrap 样式集,以便由标签助手对其进行转换。
清单 23-16:Views/Home 文件夹下的 Create.cshtml 文件,更改 Anchor 元素
@model City

@{ Layout = "_Layout"; }

<form method="post" action="/Home/Create">
    <div class="form-group">
        <label for="Name">Name:</label>
        <input class="form-control" name="Name" />
    </div>
    <div class="form-group">
        <label for="Country">Country:</label>
        <input class="form-control" name="Country" />
    </div>
    <div class="form-group">
        <label for="Population">Population:</label>
        <input class="form-control" name="Population" />
    </div>
    <button type="submit" bs-button-color="danger">Add</button>
    <button type="reset" class="btn btn-primary">Reset</button>
    <a bs-button-color="primary" href="/Home/Index">Cancel</a>
</form>
扩大标签助手的范围意味着您不必创建对不同元素类型重复相同操作的标签助手。但是,需要注意一些,因为很容易创建一个标签助手,它会在将来随着应用程序中视图的内容的发展而开始更广泛地匹配元素。一种更平衡的方法是多次应用HtmlTargetElement特性,指定将转换为狭义匹配组合的完整元素集,如清单23-17所示。
清单 23-17:Infrastructure/TagHelpers 文件夹下的 ButtonTagHelper.cs 文件,平衡范围
using Microsoft.AspNetCore.Razor.TagHelpers;

namespace Cities.Infrastructure.TagHelpers
{
    [HtmlTargetElement("button", Attributes = "bs-button-color", ParentTag = "form")]
    [HtmlTargetElement("a", Attributes = "bs-button-color", ParentTag = "form")]
    public class ButtonTagHelper : TagHelper
    {
        public string BsButtonColor { get; set; }

        public override void Process(TagHelperContext context,
                TagHelperOutput output)
        {
            output.Attributes.SetAttribute("class", $"btn btn-{BsButtonColor}");
        }
    }
}
此配置对应用程序具有相同的影响,但如果我在开发过程中出于不同的原因开始将bs-button-color属性添加到不同的元素类型,则可以确保标签助手不会造成问题。
标记助手执行排序
作为一般规则,在任何给定的 HTML 元素上只使用一个标签助手是个好主意。这是因为很容易创建这样一种情况:一个标签助手无视另一个应用的转换,覆盖属性值或内容。如果确实需要应用多个标签助手,则可以通过设置
Order属性来控制它们执行的顺序,Order属性是从TagHelper基类继承的。管理序列可以帮助最小化标签助手之间的冲突,尽管仍然很容易遇到问题。
上一节演示了如何创建一个基本的标签助手,但这只是触及了的表面。在下面的部分中,我将展示标签助手的更高级用法以及它们提供的特性。
标签助手不限于转换标准的 HTML 元素,还可以用常用的内容替换自定义元素。这可能是一个有用的功能,使视图更简洁,并使其意图更加明显。为了演示,我将 Create.cshtml 视图中的button元素替换为自定义元素,如清单23-18所示。
清单 23-18:Create.cshtml 文件,添加自定义 HTML 元素
@model City

@{ Layout = "_Layout"; }

<form method="post" action="/Home/Create">
    <div class="form-group">
        <label for="Name">Name:</label>
        <input class="form-control" name="Name" />
    </div>
    <div class="form-group">
        <label for="Country">Country:</label>
        <input class="form-control" name="Country" />
    </div>
    <div class="form-group">
        <label for="Population">Population:</label>
        <input class="form-control" name="Population" />
    </div>
    <formbutton type="submit" bg-color="danger" />
    <formbutton type="reset" />
    <a bs-button-color="primary" href="/Home/Index">Cancel</a>
</form>
formbutton元素不是 HTML 规范的一部分,浏览器不会理解它。相反,我将使用这些元素作为生成表单所需的按钮元素的缩写。我在 Infrastructure/TagHelper 文件夹中添加了一个名为 FormButtonTagHelper.cs 的类文件,并定义了如清单23-19所示的类。
提示:在处理不属于 HTML 规范的自定义元素时,必须应用
HtmlTargetElement特性并指定元素名称,如清单23-19所示。基于类名的将标签助手应用于元素的约定只适用于标准元素名称。
清单 23-19:Infrastructure/TagHelpers 文件夹下的 FormButtonTagHelper.cs 文件
using Microsoft.AspNetCore.Razor.TagHelpers;

namespace Cities.Infrastructure.TagHelpers
{
    [HtmlTargetElement("formbutton")]
    public class FormButtonTagHelper : TagHelper
    {
        public string Type { get; set; } = "Submit";
        public string BgColor { get; set; } = "primary";

        public override void Process(TagHelperContext context,
            TagHelperOutput output)
        {
            output.TagName = "button";
            output.TagMode = TagMode.StartTagAndEndTag;
            output.Attributes.SetAttribute("class", $"btn btn-{BgColor}");
            output.Attributes.SetAttribute("type", Type);
            output.Content.SetContent(Type == "submit" ? "Add" : "Reset");
        }
    }
}
Process方法使用TagHelperOuput对象的属性生成一个完全不同的元素:TagName属性用于指定button元素,TagMode属性用于指定使用开始和结束标签编写元素,Attributes.SetAttribute方法用于定义具有 Bootstrap 样式的类属性,Content属性用于设置元素内容。
提示:注意,我在清单 23-19 中的输出元素上设置了
type属性。这是因为输出元素中省略了由标签助手为其定义的属性所对应的任何 HTML 属性。这通常是个好主意,因为它阻止用于配置标签助手的属性出现在发送给浏览器的 HTML 中。但是,在本例中,我使用了type属性来配置标签助手,并且希望它也出现在输出元素中。
设置TagName属性很重要,因为输出元素与默认的自定义元素编写的样式相同。在清单23-18中,我使用了一个自结束标签,如下所示:
...
<formbutton type="submit" bg-color="danger" />
...
由于我希望输出元素包含内容,所以必须显式指定TagMode.StartTagAndEndTag枚举值,以便使用单独的开始标记和结束标记。
Content属性返回TagHelperContent类的一个实例,该实例用于设置元素的内容。表23-6描述了最重要的TagHelperContent方法。
表 23-6:有用的 TagHelperContent 方法
| 名称 | 描述 |
|---|---|
| SetContent(text) | 此方法设置输出元素的内容。字符串参数是编码的,因此可以安全地包含在 HTML 元素中。 |
| SetHtmlContent(html) | 此方法设置输出元素的内容。字符串参数被假定为安全编码。请谨慎使用。 |
| Append(text) | 此方法安全地编码指定字符串并将其添加到输出元素的内容中 |
| AppendHtml(html) | 此方法在不进行任何编码的情况下将指定字符串添加到输出元素的内容中。请谨慎使用。 |
| Clear() | 此方法移除输出元素的内容 |
在清单23-19中,标签助手使用SetContent方法根据type属性值设置输出元素的内容,该属性值是通过Type属性提供的。如果运行应用程序并请求 /Home/Create URL,您将看到自定义formbutton元素已被替换为标准 HTML 元素,以便这些元素:
...
<formbutton type="submit" bg-color="danger" />
<formbutton type="reset" />
...
被替换为以下元素:
<button class="btn btn-danger" type="submit">Add</button>
<button class="btn btn-primary" type="reset">Reset</button>
TagHelperOutput类提供了四个属性,可以方便地向视图中注入新内容,从而包围一个元素或元素的内容,如表23-7所述。在下面的部分中,我将解释如何在目标元素周围和内部插入内容。
表 23-7:附加 Context 和元素的 TagHelperOutput 属性
| 名称 | 描述 |
|---|---|
| PreElement | 此属性用于将元素插入到视图中的目标元素之前 |
| PostElement | 此属性用于将元素插入到视图中的目标元素之后 |
| PreContent | 此属性用于在目标元素的所有现存内容之前插入内容 |
| PostContent | 此属性用于在目标元素的所有现存内容之后插入内容 |
第一个TagHelperOuput属性是PreElement和PostElement,它们用于在输出元素之前和之后将元素插入视图中。作为演示,我添加了一个名为 ContentWrapperTagHelper.cs 的类文件,并使用它创建了如清单23-20所示的标签助手类。
清单 23-20:Infrastructure/TagHelpers 文件夹下的 ContentWrapperTagHelper.cs 文件
using Microsoft.AspNetCore.Mvc.Rendering;
using Microsoft.AspNetCore.Razor.TagHelpers;

namespace Cities.Infrastructure.TagHelpers
{
    [HtmlTargetElement("div", Attributes = "title")]
    public class ContentWrapperTagHelper : TagHelper
    {
        public bool IncludeHeader { get; set; } = true;
        public bool IncludeFooter { get; set; } = true;
        public string Title { get; set; }

        public override void Process(TagHelperContext context,
            TagHelperOutput output)
        {
            output.Attributes.SetAttribute("class", "m-1 p-1");

            TagBuilder title = new TagBuilder("h1");
            title.InnerHtml.Append(Title);

            TagBuilder container = new TagBuilder("div");
            container.Attributes["class"] = "bg-info m-1 p-1";

            container.InnerHtml.AppendHtml(title);

            if (IncludeHeader)
            {
                output.PreElement.SetHtmlContent(container);
            }
            if (IncludeFooter)
            {
                output.PostElement.SetHtmlContent(container);
            }
        }
    }
}
这个标签助手转换具有title属性的div元素,它通过使用PreElement和PostElement属性添加一个页眉和一个页脚来围绕输出元素。
当生成新的 HTML 元素时,您可以使用标准 C# 字符串格式来创建所需内容,但除了最简单的元素外,这对于所有的人来说都是一个尴尬和容易出错的过程。一种更健壮的方法是使用TagBuilder类,它是在Microsoft.AspNetCore.Mvc.Rendering命名空间中定义的,它允许以更结构化的方式创建元素。TagHelperContent类定义了接受TagBuilder对象的方法,这使得在标签助手中创建 HTML 内容变得很容易。
此标签助手使用TagBuilder类创建包含在div元素中的h1元素,该元素已被 Bootstrap 类样式化。有可选bool类型的include-header和include-footer属性,用于指定注入内容的位置,默认情况是在输出元素之前和之后添加元素。清单23-21更新了共享布局,使其包含一个由标签助手转换的元素。
清单 23-21:在 Views/Shared 文件夹中的 _Layout.cshtml 文件,启用标签助手
<!DOCTYPE html>
<html>
<head>
    <meta name="viewport" content="width=device-width" />
    <title>Cities</title>
    <link href="/lib/twitter-bootstrap/css/bootstrap.css" rel="stylesheet" />
</head>
<body class="m-1 p-1">
    <div title="Cities">@RenderBody()</div>
</body>
</html>
如果运行应用程序,您将看到标签助手在整个应用程序中应用,并向每个页面添加一个页眉和页脚,如图23-5所示。
PreContent和PostContent属性用于在输出元素内部围绕着原始内容插入新内容。作为演示,我在 Infrastructure/TagHelpers 文件夹中添加了一个名为 TableCellTagHelper.cs 的类,并使用它来定义清单23-22所示的类。
清单 23-22:Infrastructure/TagHelpers 文件夹下的 TableCellTagHelper.cs 文件
using Microsoft.AspNetCore.Razor.TagHelpers;

namespace Cities.Infrastructure.TagHelpers
{
    [HtmlTargetElement("td", Attributes = "wrap")]
    public class TableCellTagHelper : TagHelper
    {
        public override void Process(TagHelperContext context,
            TagHelperOutput output)
        {
            output.PreContent.SetHtmlContent("<b><i>");
            output.PostContent.SetHtmlContent("</i></b>");
        }
    }
}
这个标签助手使用wrap属性对td元素进行操作,并在输出元素内容的周围插入b和i元素。在清单23-23中,我在Index.cshtml视图文件中的一个表单元格中添加了wrap属性。
清单 23-23:Views/Home 文件夹下的 Index.cshtml 文件,添加一个 HTML 属性
@model IEnumerable<City>

@{ Layout = "_Layout"; }

<table class="table table-sm table-bordered">
    <thead class="bg-primary text-white">
        <tr>
            <th>Name</th>
            <th>Country</th>
            <th class="text-right">Population</th>
        </tr>
    </thead>
    <tbody>
        @foreach (var city in Model)
        {
            <tr>
                <td wrap>@city.Name</td>
                <td>@city.Country</td>
                <td class="text-right">@city.Population?.ToString("#,###")</td>
            </tr>
        }
    </tbody>
</table>
<a href="/Home/Create" class="btn btn-primary">Create</a>
如果运行应用程序,您将看到表格中列出City对象的第一列以粗斜体文本显示。检查发送到浏览器的 HTML,您将看到通过PreContent和PostContent属性添加的内容如何出现在元素原始内容的两侧,如下所示:
...
<tr>
<td wrap><b><i>London</i></b></td>
<td>UK</td>
<td class="text-right">8,539,000</td>
</tr>
...
提示:注意,wrap属性保留在输出元素上。这是因为我没有在标签助手类中定义与此属性相对应的属性。如果要防止属性包含在输出中,那么即使不需要使用属性值,也要在标签助手类中为它们定义一个属性。
标签助手(包括我在第24章和第25章中描述的内置助手)最常见的用途之一是转换元素,以便它们包含当前请求或当前视图模型的详细信息。作为一个示例,我将名为 FormTagHelper.cs 的类文件添加到 Infrastructure/TagHelpers 文件夹中,并定义了清单23-24中所示的类。
清单 23-24:Infrastructure/TagHelpers 文件夹下的 FormTagHelper.cs 文件的内容
using Microsoft.AspNetCore.Mvc;
using Microsoft.AspNetCore.Mvc.Rendering;
using Microsoft.AspNetCore.Mvc.Routing;
using Microsoft.AspNetCore.Mvc.ViewFeatures;
using Microsoft.AspNetCore.Razor.TagHelpers;
namespace Cities.Infrastructure.TagHelpers
{
    public class FormTagHelper : TagHelper
    {
        private IUrlHelperFactory urlHelperFactory;

        public FormTagHelper(IUrlHelperFactory factory)
        {
            urlHelperFactory = factory;
        }

        [ViewContext]
        [HtmlAttributeNotBound]
        public ViewContext ViewContextData { get; set; }
        public string Controller { get; set; }
        public string Action { get; set; }

        public override void Process(TagHelperContext context,
            TagHelperOutput output)
        {
            IUrlHelper urlHelper = urlHelperFactory.GetUrlHelper(ViewContextData);

            output.Attributes.SetAttribute("action", urlHelper.Action(
                Action ??
                    ViewContextData.RouteData.Values["action"].ToString(),
                Controller ??
                    ViewContextData.RouteData.Values["controller"].ToString()));
        }
    }
}
正如其名称所建议的,FormTagHelper类在form元素上操作,设置它们的 action 属性,以指定将发送表单数据的位置。如果form元素具有controller和action属性,则这些值将用于生成目标 URL;否则,将使用来自当前请求的路由数据的controller和action值。
要获取 context 数据,我添加了一个名为ViewContextData的属性,并使用两个特性对其进行了修饰,如下所示:
...
[ViewContext]
[HtmlAttributeNotBound]
public ViewContext ViewContextData { get; set; }
...
ViewContext特性表示当创建FormTagHelper类的新实例时,该属性的值应该被分配ViewContext对象,如第18章所述。ViewContext类提供了正在渲染的视图、路由数据和当前 HTTP 请求的详细信息,如第21章中所述。
如果input HTML 元素上有view-context属性,HtmlAttributeNotBound属性将阻止 MVC 为该属性分配值。这是一个很好的实践,特别是如果您正在为其他开发人员编写标签助手时。
提示:表单类的内置标签助手可用于目标的 action 方法,并且您应该在实际项目中使用。本节中的助手只是演示如何使用 context 数据。请参见第24章了解内置标签助手的详细信息。
标签助手可以在其构造函数中声明对服务的依赖关系,这些依赖项使用依赖注入功能进行解析。在本例中,我声明了对IUrlHelperFactory服务的依赖,它允许从路由数据创建传出 URL(并且是我在第16章中描述的Controller类提供的Url属性后面的服务)。在Process方法中,标签助手使用IUrlHelperFactory.GetUrlHelper方法获得一个IUrlHelper对象,该对象使用ViewContext对象配置,然后用于为输出元素上的action属性创建一个 URL。清单23-25显示了视图的准备过程,在该视图中,我删除了action属性,以便标签助手可以设置该属性。
清单 23-25:Create.cshtml 文件,移除表单元素属性
@model City

@{ Layout = "_Layout"; }

<form method="post">
    <div class="form-group">
        <label for="Name">Name:</label>
        <input class="form-control" name="Name" />
    </div>
    <div class="form-group">
        <label for="Country">Country:</label>
        <input class="form-control" name="Country" />
    </div>
    <div class="form-group">
        <label for="Population">Population:</label>
        <input class="form-control" name="Population" />
    </div>
    <formbutton type="submit" bg-color="danger" />
    <formbutton type="reset" />
    <a bs-button-color="primary" href="/Home/Index">Cancel</a>
</form>
如果运行应用程序,请求 /Home/Create URL,并检查发送到浏览器的 HTML,您将看到form元素具有一个action属性,其值是使用 context 数据获得的,如下所示:
...
<form method="post" action="/Home/Create">
...
标签助手可以对视图模型进行操作,裁剪它们执行的转换或它们创建的输出。为了演示,我在 Infrastructure/TagHelpers 文件夹中添加了一个名为 LabelAndInputTagHelper.cs 的文件,并使用它来定义清单23-26所示的类。
清单 23-26:Infrastructure/TagHelpers 文件夹下的 LabelAndInputTagHelper.cs 文件
using Microsoft.AspNetCore.Mvc.ViewFeatures;
using Microsoft.AspNetCore.Razor.TagHelpers;

namespace Cities.Infrastructure.TagHelpers
{
    [HtmlTargetElement("label", Attributes = "helper-for")]
    [HtmlTargetElement("input", Attributes = "helper-for")]
    public class LabelAndInputTagHelper : TagHelper
    {
        public ModelExpression HelperFor { get; set; }

        public override void Process(TagHelperContext context,
            TagHelperOutput output)
        {
            if (output.TagName == "label")
            {
                output.TagMode = TagMode.StartTagAndEndTag;
                output.Content.Append(HelperFor.Name);
                output.Attributes.SetAttribute("for", HelperFor.Name);
            }
            else if (output.TagName == "input")
            {
                output.TagMode = TagMode.SelfClosing;
                output.Attributes.SetAttribute("name", HelperFor.Name);
                output.Attributes.SetAttribute("class", "form-control");
                if (HelperFor.Metadata.ModelType == typeof(int?))
                {
                    output.Attributes.SetAttribute("type", "number");
                }
            }
        }
    }
}
此标签助手转换具有helper-for属性的label和input元素。此标签助手的重要部分是HelperFor属性的类型,该属性用于接收helper-for属性的值。
...
public ModelExpression HelperFor { get; set; }
...
当您想对视图模型的一部分进行操作时,就会使用ModelExpression类,最容易的解释方法是往前跳,展示如何在视图中应用标签助手,如清单23-27所示。
清单 23-27:Views/Home 文件夹下的 Create.cshtml 文件,应用标签助手
@model Cities.Models.City

@{ Layout = "_Layout"; }

<form method="post">
    <div class="form-group">
        <label helper-for="Name" />
        <input helper-for="Name" />
    </div>
    <div class="form-group">
        <label helper-for="Country" />
        <input helper-for="Country" />
    </div>
    <div class="form-group">
        <label helper-for="Population" />
        <input helper-for="Population" />
    </div>
    <formbutton type="submit" bg-color="danger" />
    <formbutton type="reset" />
    <a bs-button-color="primary" href="/Home/Index">Cancel</a>
</form>
helper-for属性的值是来自模型类的属性,该属性由 MVC 检测,并以ModelExpression对象的形式呈现给标签助手。
我不打算详细描述ModelExpression类,因为对类型的任何内省都会导致层出不穷的类和属性列表。此外,MVC 附带了一组有用的内置标签助手,它使用视图模型转换元素,如第24章所述,这意味着您不需要创建自己的元素。
对于示例标签助手,我使用了两个值得描述的基本特性。第一个是获取模型属性的名称,以便将其包含在输出元素中,如下所示:
...
output.Content.Append(HelperFor.Name);
output.Attributes.SetAttribute("for", HelperFor.Name);
...
Name属性返回模型属性的名称。第二个特性是获取模型属性的类型,以便我可以更改输入元素上的type属性的值,如下所示:
...
if (HelperFor.Metadata.ModelType == typeof(int?)) {
output.Attributes.SetAttribute("type", "number");
}
...
如果运行该示例,请求 /Home/Create URL,并检查发送到浏览器的 HTML,您将看到以下元素:
<div class="form-group">
    <label for="Name">Name</label>
    <input name="Name" class="form-control" />
</div>
<div class="form-group">
    <label for="Country">Country</label>
    <input name="Country" class="form-control" />
</div>
<div class="form-group">
    <label for="Population">Population</label>
    <input name="Population" class="form-control" type="number" />
</div>
用于名为Population的input元素的type属性被设置为number,说明了 C# 类中的City.Population属性是int,显示由标签助手生成的 HTML 如何反映模型的不同特征。这取决于您使用的浏览器,此input元素只允许输入数字。
TagHelperContext.Items属性提供了一个字典,用于在对元素进行操作的标签助手和对其后代操作的标签助手之间进行协调。为了演示Items集合的用法,我在 Infrastructure/TagHelpers 文件夹中添加了一个名为 CoordinatingTagHelpers.cs 的类文件,并使用它定义了清单23-28所示的一对标签助手。
清单 23-28:Infrastructure/TagHelpers 文件夹下的 CoordinatingTagHelpers 文件
using Microsoft.AspNetCore.Razor.TagHelpers;

namespace Cities.Infrastructure.TagHelpers
{
    [HtmlTargetElement("div", Attributes = "theme")]
    public class ButtonGroupThemeTagHelper : TagHelper
    {
        public string Theme { get; set; }

        public override void Process(TagHelperContext context,
        TagHelperOutput output)
        {
            context.Items["theme"] = Theme;
        }
    }

    [HtmlTargetElement("button", ParentTag = "div")]
    [HtmlTargetElement("a", ParentTag = "div")]
    public class ButtonThemeTagHelper : TagHelper
    {
        public override void Process(TagHelperContext context,
            TagHelperOutput output)
        {
            if (context.Items.ContainsKey("theme"))
            {
                output.Attributes.SetAttribute("class",
                    $"btn btn-{context.Items["theme"]}");
            }
        }
    }
}
第一个标签助手是ButtonGroupThemeTagHelper类,它对具有theme属性的div元素进行操作。协调标签助手可以转换它们自己的元素,但是这个示例只是将theme属性的值添加到Items字典中,以便它是可以用于对div元素中包含的元素进行操作的标签助手。
第二个标签助手是ButtonThemeTagHelper类,它对包含在div元素中的button和a元素进行操作。此助手使用来自Items字典的theme值为其输出元素设置 Bootstrap 样式。清单23-29显示了将应用这些助手的一组元素。
清单 23-29:Views/Home 文件夹下的 Create.cshtml 文件,应用标签助手协调
@model Cities.Models.City

@{ Layout = "_Layout"; }

<form method="post">
    <div class="form-group">
        <label helper-for="Name" />
        <input helper-for="Name" />
    </div>
    <div class="form-group">
        <label helper-for="Country" />
        <input helper-for="Country" />
    </div>
    <div class="form-group">
        <label helper-for="Population" />
        <input helper-for="Population" />
    </div>
    <div theme="primary">
        <button type="submit">Add</button>
        <button type="reset">Reset</button>
        <a href="/Home/Index">Cancel</a>
    </div>
</form>
如果运行应用程序并请求 /Home/Create URL,您将看到这组按钮的样式都是相同的。如果您将div元素上的theme属性的值更改为另一个 Bootstrap 主题设置,如info或danger,并重新加载页面,您将看到按钮样式中反映的更改,如图23-6所示。
标签助手可以通过调用TagHelperOutput对象上的SuppressOuput方法来防止元素被包含在发送到浏览器的 HTML 中,该方法作为Process方法的参数被接收。在清单23-30中,我向共享布局中添加了一个元素,该元素显示一个高度可见的消息,但我只希望显示对给定 action 的请求。
清单 23-30:Views/Shared 文件夹下的 _Layout.cshtml 文件,添加可见消息
<!DOCTYPE html>
<html>
<head>
    <meta name="viewport" content="width=device-width" />
    <title>Cities</title>
    <link href="/lib/twitter-bootstrap/css/bootstrap.css" rel="stylesheet" />
</head>
<body class="m-1 p-1">
    <div show-for-action="Index" class="m-1 p-1 bg-danger">
        <h2>Important Message</h2>
    </div>
    <div title="Cities">@RenderBody()</div>
</body>
</html>
show-for-action属性指定了我想要显示警告的 action 的名称。这不是控制实际应用程序中包含内容的有用方法,但是对于一个只有一个控制器和两个 action 名称的示例应用程序来说,这已经足够了。清单23-31显示了 SelectiveTagHelper.cs 类文件的内容,我将其添加到 Infrastructure/TagHelpers 文件夹中。
清单 23-31:Infrastructure/TagHelpers 文件夹下的 SelectiveTagHelper.cs 文件
using System;
using Microsoft.AspNetCore.Mvc.Rendering;
using Microsoft.AspNetCore.Mvc.ViewFeatures;
using Microsoft.AspNetCore.Razor.TagHelpers;

namespace Cities.Infrastructure.TagHelpers
{
    [HtmlTargetElement(Attributes = "show-for-action")]
    public class SelectiveTagHelper : TagHelper
    {
        public string ShowForAction { get; set; }

        [ViewContext]
        [HtmlAttributeNotBound]
        public ViewContext ViewContext { get; set; }

        public override void Process(TagHelperContext context,
            TagHelperOutput output)
        {
            if (!ViewContext.RouteData.Values["action"].ToString()
                .Equals(ShowForAction, StringComparison.OrdinalIgnoreCase))
            {
                output.SuppressOutput();
            }
        }
    }
}
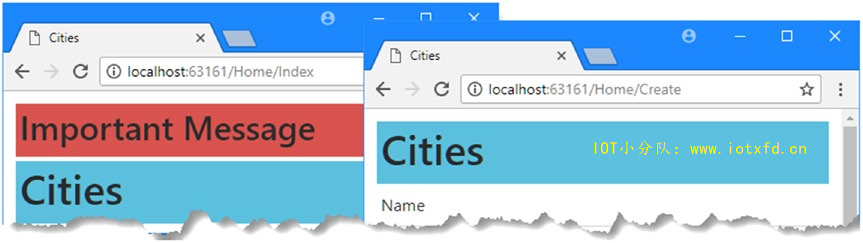
这个标签助手使用ViewContext从路由数据中获取action值,并将其与 HTML 元素上的show-for-action属性的值进行比较。如果它们不匹配,则调用SuppressOutput方法。要查看效果,启动应用程序并请求 /Home/Index 和 /Home/Create URL。如图23-7所示,只有在Index action 被锁定时才会显示消息。
在本章中,我描述了标签助手的使用,它是 ASP.NET Core MVC 的一个新的补充。我解释了它们在 Razor 视图中所起的作用,并演示了如何创建、注册和应用自定义标签助手。我向您展示了如何控制标签助手的作用域,并描述了标签助手可以转换 HTML 元素的不同方式。用于处理 HTML 表单元素的标签助手。
;